Hello everyone,
We are back with the second part of the Maxwell Xpert Tips series containing some useful tips you don’t want to miss! The Maxwell Render Xperts have mastered the software and in many cases offer training services, so you can drop them a line when in need. Read on, and please do share your own tips and/or techniques you have developed along the way! 🙂
Maria Chiara Virgili
Maria Chiara Virgili is an Architect specializing in 3D modeling and high-quality visualizations for advertising companies, architects and designers. Maria has worked for Fuksas Architecture, where she specialized in portraying unbuilt architecture for international competitions. She has also worked as a professor for authorized centers and universities.
In addition, Maria is a freelance 3D artist, founder of ReDome3D (online platform for CGI services), an authorized trainer for McNeel, as well an expert Autodesk user.
TIP:
As a lover of DOF and Bokeh effects, I think that customizing aperture and obstacle maps as well as playing with diffraction, are significant features which provide the artist with ultimate control over the shape and body of the aperture in order to create an extremely realistic variety of effects!

Abed Sabeh
Abed has over 20 years of experience in photo retouching, 3D animation, rendering, design and graphics, mostly concentrated in the advertising industry. During this time, he has worked with numerous companies on many large-scale projects and has collaborated with all the major international advertising agencies.
Abed is renowned for his ability to consistently deliver high-quality work above and beyond industry standards. With extensive past experience working in the Middle East, he is currently based in Italy and has expanded his work to include collaborations with more European and American companies.
TIP:
How to make a 100% reflective glass from one side and 100% transparent from the other side, using the back culling enabled on the 100 % reflective object? It can be applied onto a thick plane with 2 separate faces. This is useful when you have reflective windows for architectural rendering, offices/buildings, security rooms, or maybe any other purposes like sunglasses, or 100% reflective ski sunglasses, etc.

 Mohamad Saied

Mohamad Saied is a CGI artist based in Hamburg, Germany. His main focus is product visualization combined with a passion for shading, lighting and rendering. With over 6 years of experience Mohamad has worked in multiple studios, as well as being a freelancer in Syria, Turkey, and currently the lead CGI artist at Scholz & Friends Hamburg – one of the major advertising agencies in Europe. Mohamad’s photography-based approach to lighting in his CGI projects made Maxwell his preferred tool for lighting and rendering, and he has been using it for almost half of his career now.
TIP:
While almost all other renderers use a simplified approach for setting the index of refraction (IOR) for materials with just one number, Maxwell takes the more physically accurate approach and uses a combination of two parameters to define the index of refraction of a material. The first one is the Nd number which represents the index of refraction, usually used in other renderers as well. The second parameter, and that is what’s unique about Maxwell Render, is using the K number which represents the Extinction Coefficient. Combining these two parameters will result in the most physically-accurate representation of your materials IOR compared to any other render engine available.

Federico Biffi Gentili

Federico launched his freelance designer career in 2005. In collaboration with Alessio Zampolini, he founded his own design studio in 2009 in Florence, Italy. Un-real Studio creates original and innovative products, through the development of transversal projects connected to all the business sectors of design, retail, interior, communication. Un- real is also an Authorized Training Center, which offers two different professional services – 3D computer graphics training and training to applications with high technological content such as parametric 3D modeling, advanced rendering, lights simulation, 3D animation.
TIP:
I love the “Multilayer” Maxwell Material’s structure. With great simplicity, you can create a single material, with a different layer, where it’s possible to diversify the surface finishes, integrate lighting, and control the holes, starting from a texture. A very useful way to obtain high-quality complex materials, which have a low impact on render times.

 Dan Hruby
Daniel Hruby is the owner of Visualize It Built and is a licensed California architect specializing in high-end residential design. VIB provides 3D modeling and rendering services for anyone needing photorealistic images and animations of their designs. Daniel provides customized Maxwell training services for ArchiCAD and SketchUp and Modo users.
TIP:
Get more out of your render time! Use Multilight to create several lighting variations of your scene. For interior scenes, you can have a day shot and a night shot by disabling or lowering Sun and Environment values and turning on some lights.
Rob Redman
Rob is the Creative Director at a boutique VFX and animation studio, working across print, film and TV. As well as being a regular writer and contributing editor at 3D World and 3D Total, he is also often found presenting at various events, such as FMX and THU.
TIPS:
Work to scale! I tell all my students this. It makes it easier to collaborate, reuse assets, render predictably and use references and instructions. It’s vital for working in VFX and ArchViz but very useful for everything else too.
Work to real world measurements. Not only will you get more realistic and consistent results but you’ll see other benefits from building an asset library that will work in any scene, to easier collaboration.
Don’t forget this will also help when creating materials as you can work off one meter grids and previews.
 Mattia Sullini

Mattia is an Architect working as a freelance artist since 1999 for small studios providing wide-spectrum task-based visualization digital services ranging from archviz, to custom 3D modeling, to survey and reconstruction. He initially used LightWave but eventually switched to Modo in 2005, and he has been using Maxwell since the beta version. He currently uses Maxwell extensively on almost every project he works on and he has completed around 400 projects so far with the software.
TIPS:
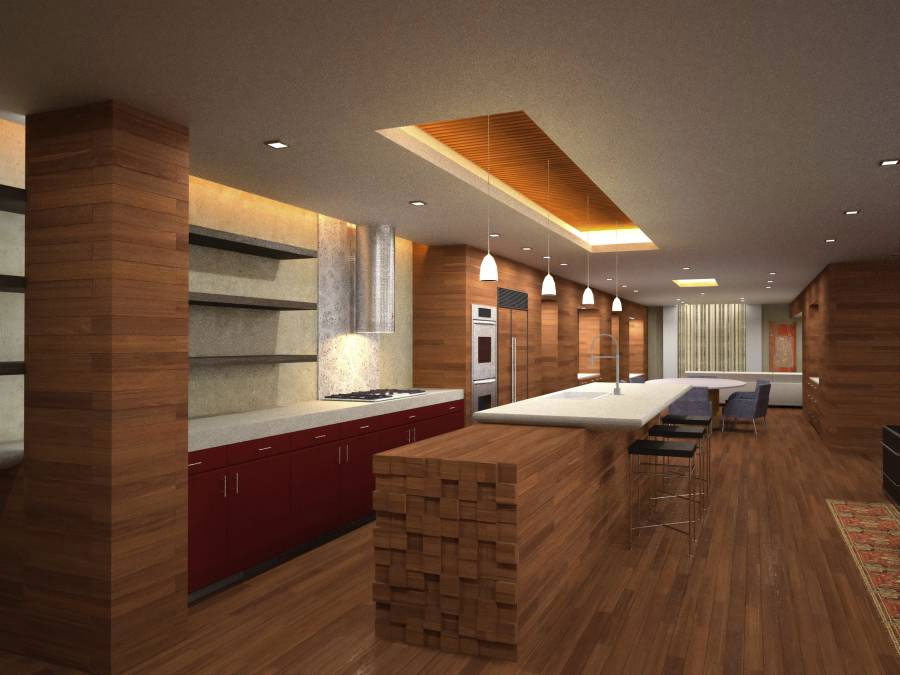
Spotlight setup in interiors:
Being “physically correct” does not mean you can’t use some tricks, right? Architectural Photography itself makes wide use of light sources that actually do not belong to the project, especially when shooting in interiors to fill the shadows or produce highlights on shiny materials. As digital photographers, we have some additional freedom degree and can actually use invisible emitters. A typical situation when you would use them is when you are dealing with a night interior where the primary light source are ceiling spotlights, that cause a lot of noise. In such cases, you can split the light in three emitters.The first one will be a very tiny sphere placed right below the spotlight lens associated with a proper IES for the light cone, especially if it has to appear on walls or floors.
The second one is the lens itself that is intended to appear in reflections if you need to, keep it right above the burn point so that it won’t contribute significantly to lighting.
With the third comes the tricky part: place 30x30cm circle right below the sphere you used for IES and apply a material compose by two layers where the first one is an emitter and the second one is air (100% transparency, 0% roughness, 0% diffuse). Go to attribute panel and under the section “appearance” check hidden to camera and to reflections/refractions. This third emitter will work as a fill light that will help you to greatly reduce the noise in the least lit surfaces of your set.
