 Hello everyone,
We are back with some valuable tips by our very own Product Specialist, Fernando Tella. Fer is long-time Maxwell user, ever since the alpha version in 2005! Ten years later he joined the Maxwell team. Now he helps customers with technical issues, and also does product demos, tutorials, trainings and helps with product development. In this blogpost he will help you grasp Maxwell 4’s new top feature – the Denoiser, so you can take advantage of its full potential. Here we go 🙂
The basics
As a start, it’s important to understand some basic concepts:
- When using the Denoiser, Maxwell launches two renders.
- It also automatically activates some extra channels that help preserve the details of the image, such as texture details, the shapes of the objects, materials, etc.
- All this is done automatically when launching a render with the Denoiser
A different kind of noise (a clean one)
The new Denoiser integration gives you usable denoised images as the render progresses. In a similar way as Maxwell progressively cleans the image, the denoised image evolves with the render. At the beginning, when the sampling level is very low, the render will look blurry, and as the render gets more defined you’ll start noticing it starts to “learn” where are the limits of the objects, materials, the features of the textures, etc. As the sampling level goes up, the denoised image and the original render will get closer and closer, so we can say the denoised image also converges to the natural solution with time, as well as the original render, but instead of noise, you get usable images (or even perfect ones) in the meantime.
The following video shows how the denoised and render image evolves as the render goes on, from sampling level 4 to 13 (Scene by Maxwell Xpert David de las Casas).
So, in the worse scenario, it will take the same time as the not-denoised image, and in the best, you will save a lot of time.
Combining techniques
TIP 2: Use the Denoiser and Extra Sampling combo
If you find that some particular materials get too blurred when using the Denoiser (for example, in the case of grainy textures), but most of the image looks good at some particular SL, you can combine two different techniques: Denoiser and Extra Sampling.
The idea you have to keep in mind is that the longer the render goes on, the less information the Denoiser will have to guess and the more it will be based on the true render, so if one particular texture is problematic, usually you only have to render it longer.
Based on this, if you have a particularly problematic material were the texture itself is grainy, like sand, sugar or the towel in this case, you only have to render the whole image until the needed SL and then use Extra Sampling for that material or object to render to a higher SL only in that part.
Please note that, for the moment, when using Extra Sampling, the Denoiser will only be calculated at the end of the render, not at each SL, so you’ll have to wait until the end to see the denoised result.
Objects behind transparent geometries
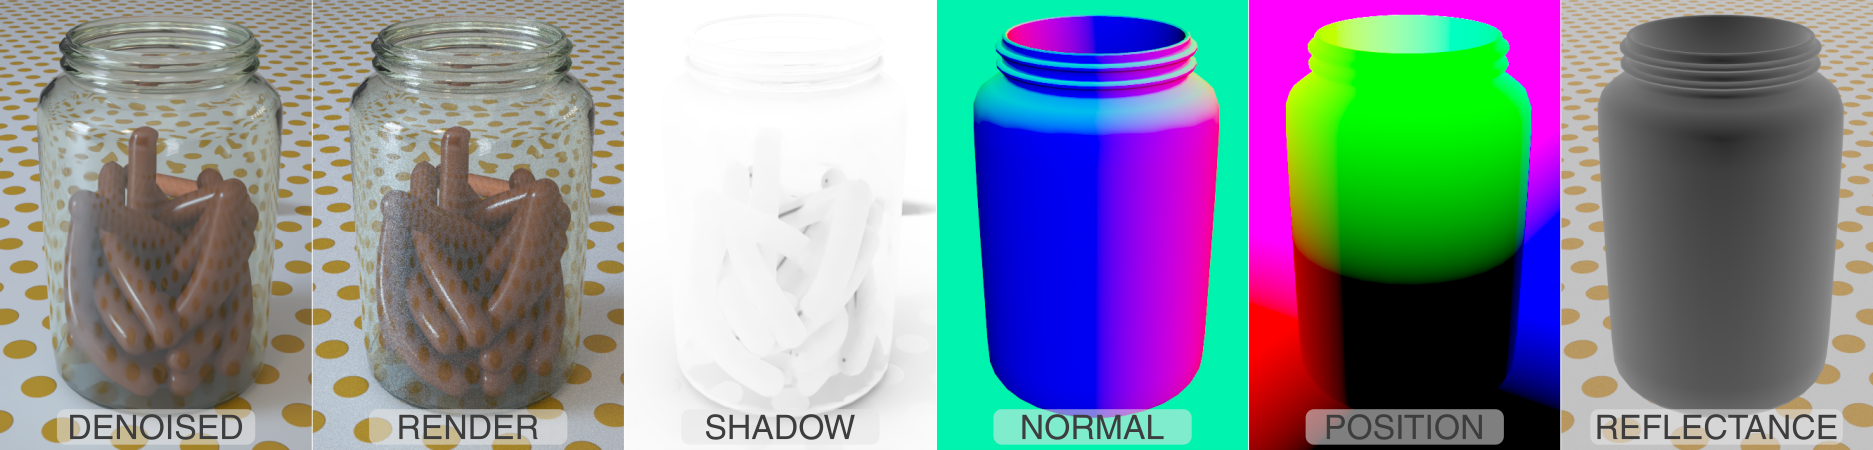
TIP 3: For objetcs behind transparent geometries use the Shadow Channel
 When an important part of your scene contains objects behind transparent ones, you’ll notice the extra channels used in Fast mode (Normals, Position and Reflectance) won’t give information about what’s behind the glass.
In these cases, you could consider using Accurate mode, which adds Shadow channel, as it will give information about what’s behind the glass and this will improve the Denoiser result.
In this case the render will take more time (around 1.5 the time without shadow channel), so it will be wise to test which will be better: render with the Shadow channel or let the render reach a higher SL without the Shadow channel. The result in terms of time can be very similar.
Re-denoise after closing Maxwell
TIP 4: Use saved MXI files to denoise after closing Maxwell
For the moment, once Maxwell is closed after rendering an image with the Denoiser, the two passes cannot be loaded again into the interface to resume them or make changes and Re-Denoise. Nevertheless, if you have at least a couple of mxi files of the same frame (and with the required channels), you can make Maxwell denoise them by running the following commands through command line:
mximerge -folder:“folder containing the mxi files of the same frame” -coopdenoiser:“output path and name of the denoised image” -target:“path of the merged mxi files”
Then you ask – “But where can I find the two mxi files saved while rendering with Denoiser?”
See below the paths where they are stored depending on the OS. You will find two files named as your current scene and ending with _render1.mxi and _render2.mxi:
In Windows they are stored under: C:\Users\<username>\AppData\Local\Temp\maxwellrendertmp
In MacOS they are stored in a random folder under: private/var/folders/…../T/maxwellrendertmp/
Macro in denoised image name
TIP 5: Use a macro for the denoised image name
When setting the denoised image name, instead of setting a specific name, it might be better to use a macro like %scenename% (including the %)
It creates the perfect name, as the macro is replaced by the scene name when saving the file and avoids having to rename the denoised image file when you want to make different versions of your rendered files.
For example, if you are rendering a scene named cool_render.mxs, you can set the Denoiser output path as Denoised_%scenename%.png
Once the render is finished, you will get a file called Denoised_cool_render.png.
Another useful macro could be %camera%, which is replaced by the name of the active camera.
Here is the list of all the supported macros, in case you find this convenient.
I hope you’ll find these tips useful and help you master the use of the Denoiser! 🙂
Cheers!
Fernando