Juan Manuel Molleví is a 24-year-old Creative Director, who has worked in Spain, Finland and is currently based in Sydney, Australia where apparently it has recently snowed! Hard for us to believe over here in sweltering Madrid.
As an advertising professional, Molleví specializes in Advertising Creativity through Art Direction & CGI Design. On his website and Facebook page you can find lots of his work – ranging from client to personal projects. Molleví started his professional career as a freelance graphic designer and did his first internship in Finland. He then went on to do a Master of Audiovisual and Advertising Content in Barcelona, Spain. Molleví loves to learn and this year he has been taught 3D at FX ANIMATION Barcelona 3D School in the Master program 3D for Design and Photography. There he was using Maxwell Render and he did a beautiful project called Finite Energy to represent the fragile state of non-renewable energies. Today he brings us the breakdown of the project. Thanks, Molleví 🙂
FX ANIMATION Barcelona 3D School use the Free Faculty & Student Maxwell Render licenses and teach Maxwell in the following courses:
- Master in 3D for Design and Photography

- Photorealistic render course with Maxwell Render
- Master in VFX
- Specialization Master in VFX with Houdini and RealFlow
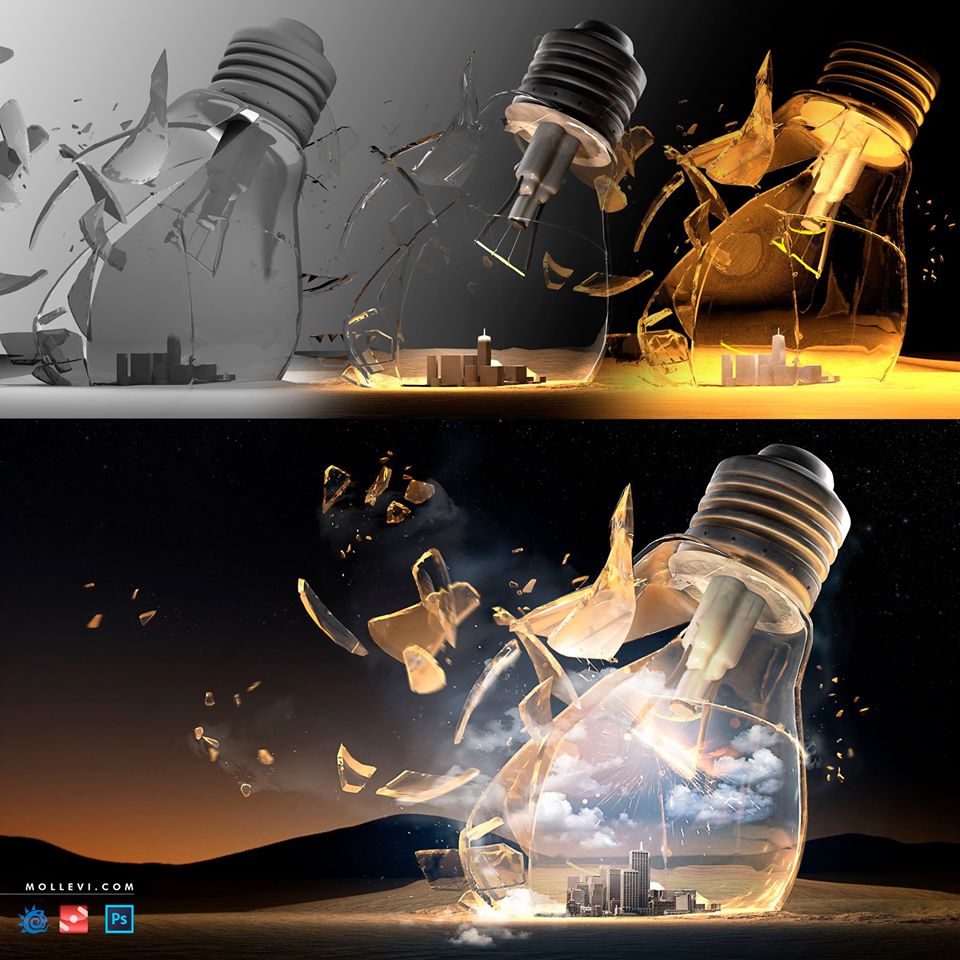
1. Modeling

The model and display of the elements in the scene. The broken effects are done with Bullet engine in LightWave. In setting up the main lighting of the composition, I paid close attention to the glass and metal.
2. Alpha
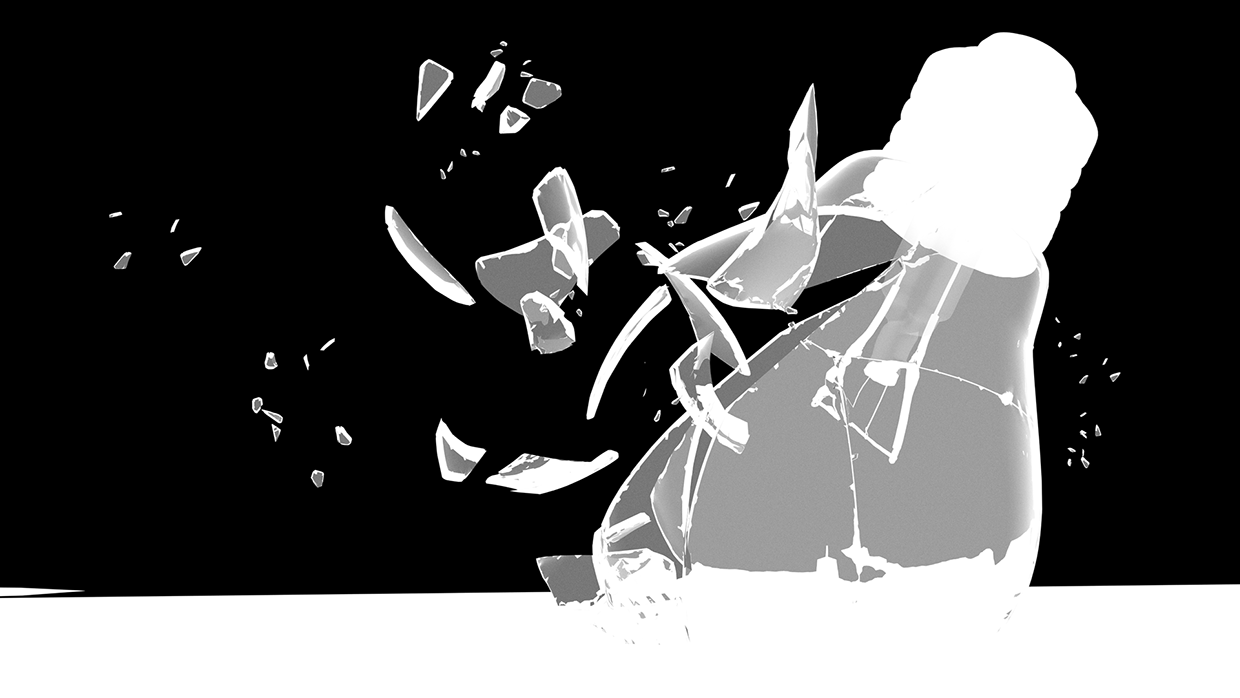 The alpha pass for masking layers later in Photoshop. You can save it in the channel section. Also, by using the Photoshop plugin included with Maxwell, you can export an MXI file (Maxwell Render Image file) that includes all the passes. The MXI format is a very rich container that can include all channels/passes that Maxwell Render generates, so you can access all of them as layers in Photoshop, avoiding the use of intermediate formats (EXRs and so on).
3. Working with Maxwell
This is the second pass for the realistic glass effect in Maxwell Render. For this I first had to install Maxwell’s LightWave plugin which comes included with Maxwell. To install it you have to seek the route Plugins 64bits of Newteck. Also, you can customize the Layout menu in: Edit > Menu Layout.
To build a scene in LightWave that works well in Maxwell, you have to apply shaders to the geometry to make them work as lights. Lighting engine in Layout from LightWave isn’t compatible with Maxwell, so you have to construct your one-sided rectangles or spheres to set up your light sources.
The most challenging part in this step was setting up the right lighting. I had to apply shaders to the textures in LightWave (MaxwellLayeredMaterial included in the plugin). To convert certain textures to light emitters we have to delete the BSDF attribute and apply Add Emitter.
LightWave Plugin Developer Tip: the plug-in supports native LigntWave lights (spot, point and area), so it’s not mandatory to create geometry for lights and apply Maxwell emitters manually. However, applying a Maxwell material gives the artist more control over the parameters, so in some cases it’s better to do that.
Finite Energy was the first time I worked with Maxwell Render, and I am very surprised with the results. I have seen that the creation of materials corresponds to settings that you can find in nature, as refraction, and this is something fantastic.
For example, in LightWave I have to manually set up the Fresnel effect with gradients – but in Maxwell I can find a bunch of preset materials thanks to V3’s Material Assistants. These react to light as in real life (glass and metal in this project).
We were practicing with Bullet engine in the course – specifically making the bulb explode and then learning how to render in Maxwell. I am so happy with the results and I am planning to keep practicing with it and achieve higher levels of realism.
4. Occlusion

The Occlusion pass, used in Photoshop in an overlay fusion mode to enhance the shadows. Black parts help to get a bolder sensation of the volume.
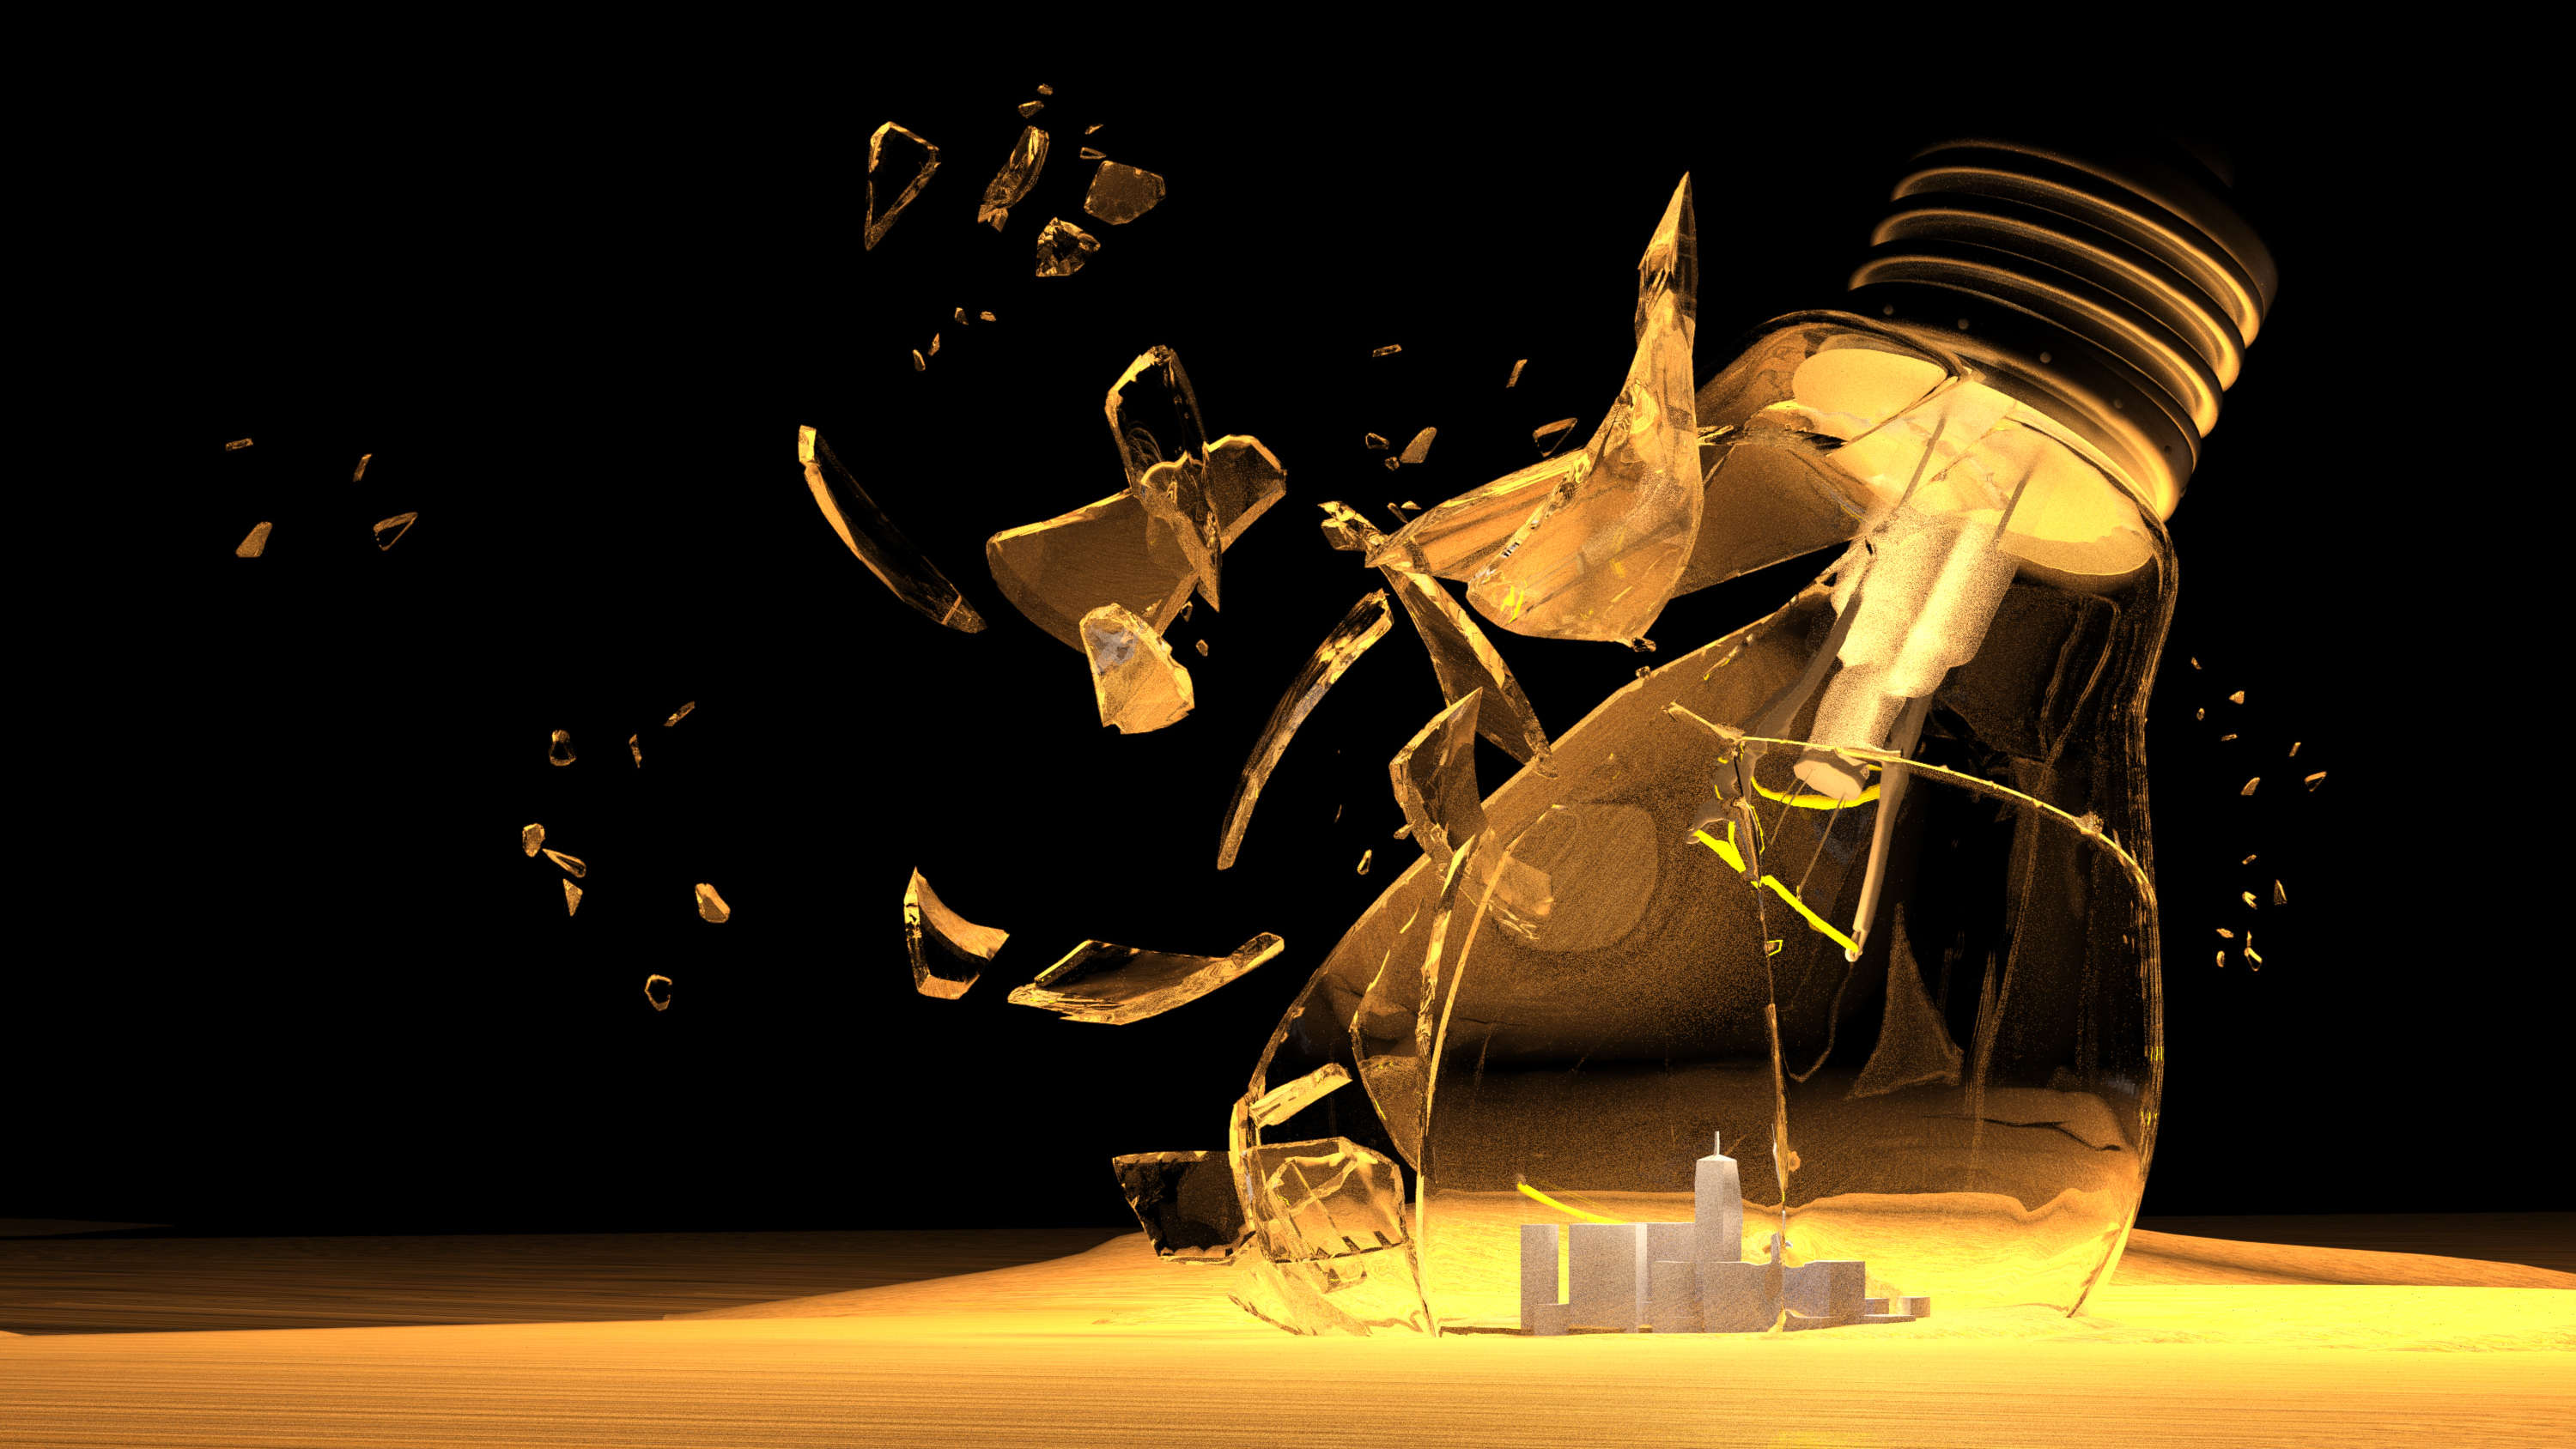
5. Render without clouds
This is the base of our artwork once all the render passes are merged with different kinds of fusion modes. While the glass is based on additive fusion styles and regulated through mask layers with gradients, the metallic parts are composed with subtractive fusion modes.
Also, I merged a real photograph of a city that matches the luminosity of the bulb with the multiply mode and the normal mode, creating a more detailed version of the buildings.
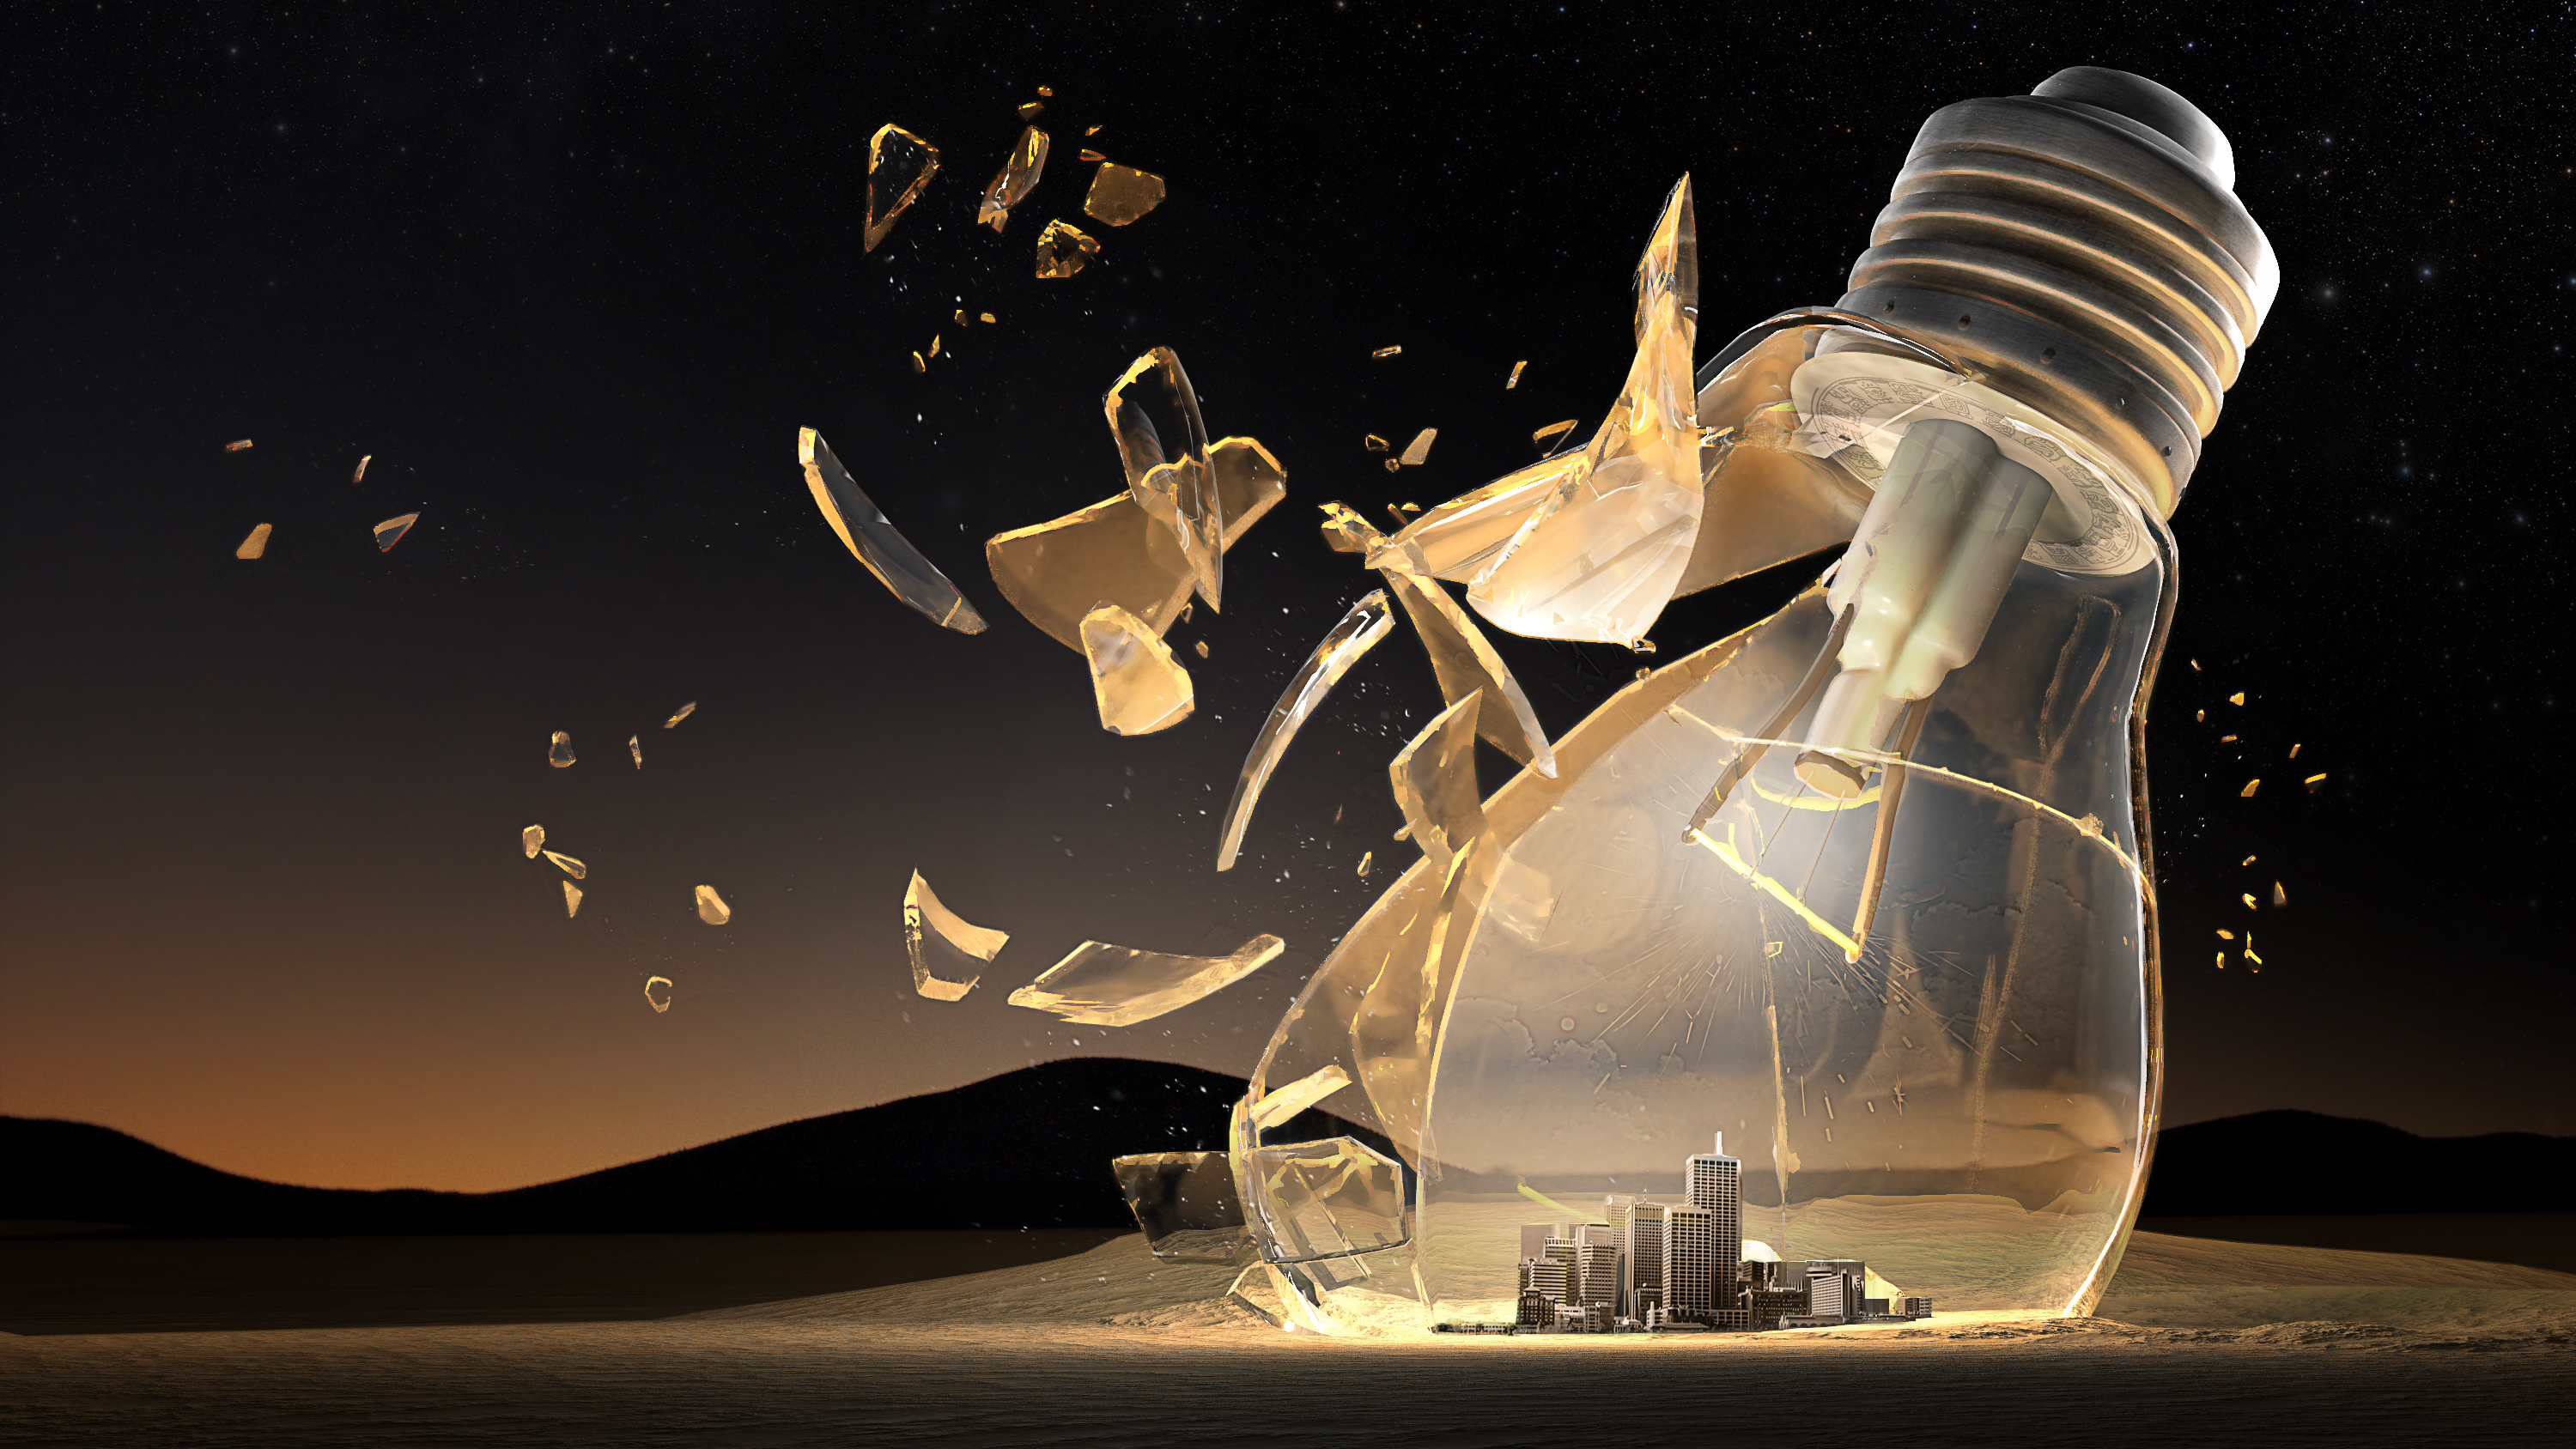
6. Composition

The landscape is based on a photograph that can be added through screen fusion mode due to the dark tonalities of the render without affecting it. I have used 2 different sets of brushes: a smoke one and a cloud one. I have positioned the main smoke stream and deformed it with the transform tool to get the illusion of this sort of “atmosphere” escaping from its container. For the clouds, I began deciding the heterogeneous display in the main glass, but also I had to split them in the edge of the broken glass to respect the refraction properties of real glass. I have been using masks to recreate this lens effect and also added a real photograph of sparkles and fire to the exploding resistance with screen fusion mode.
7. Final Project
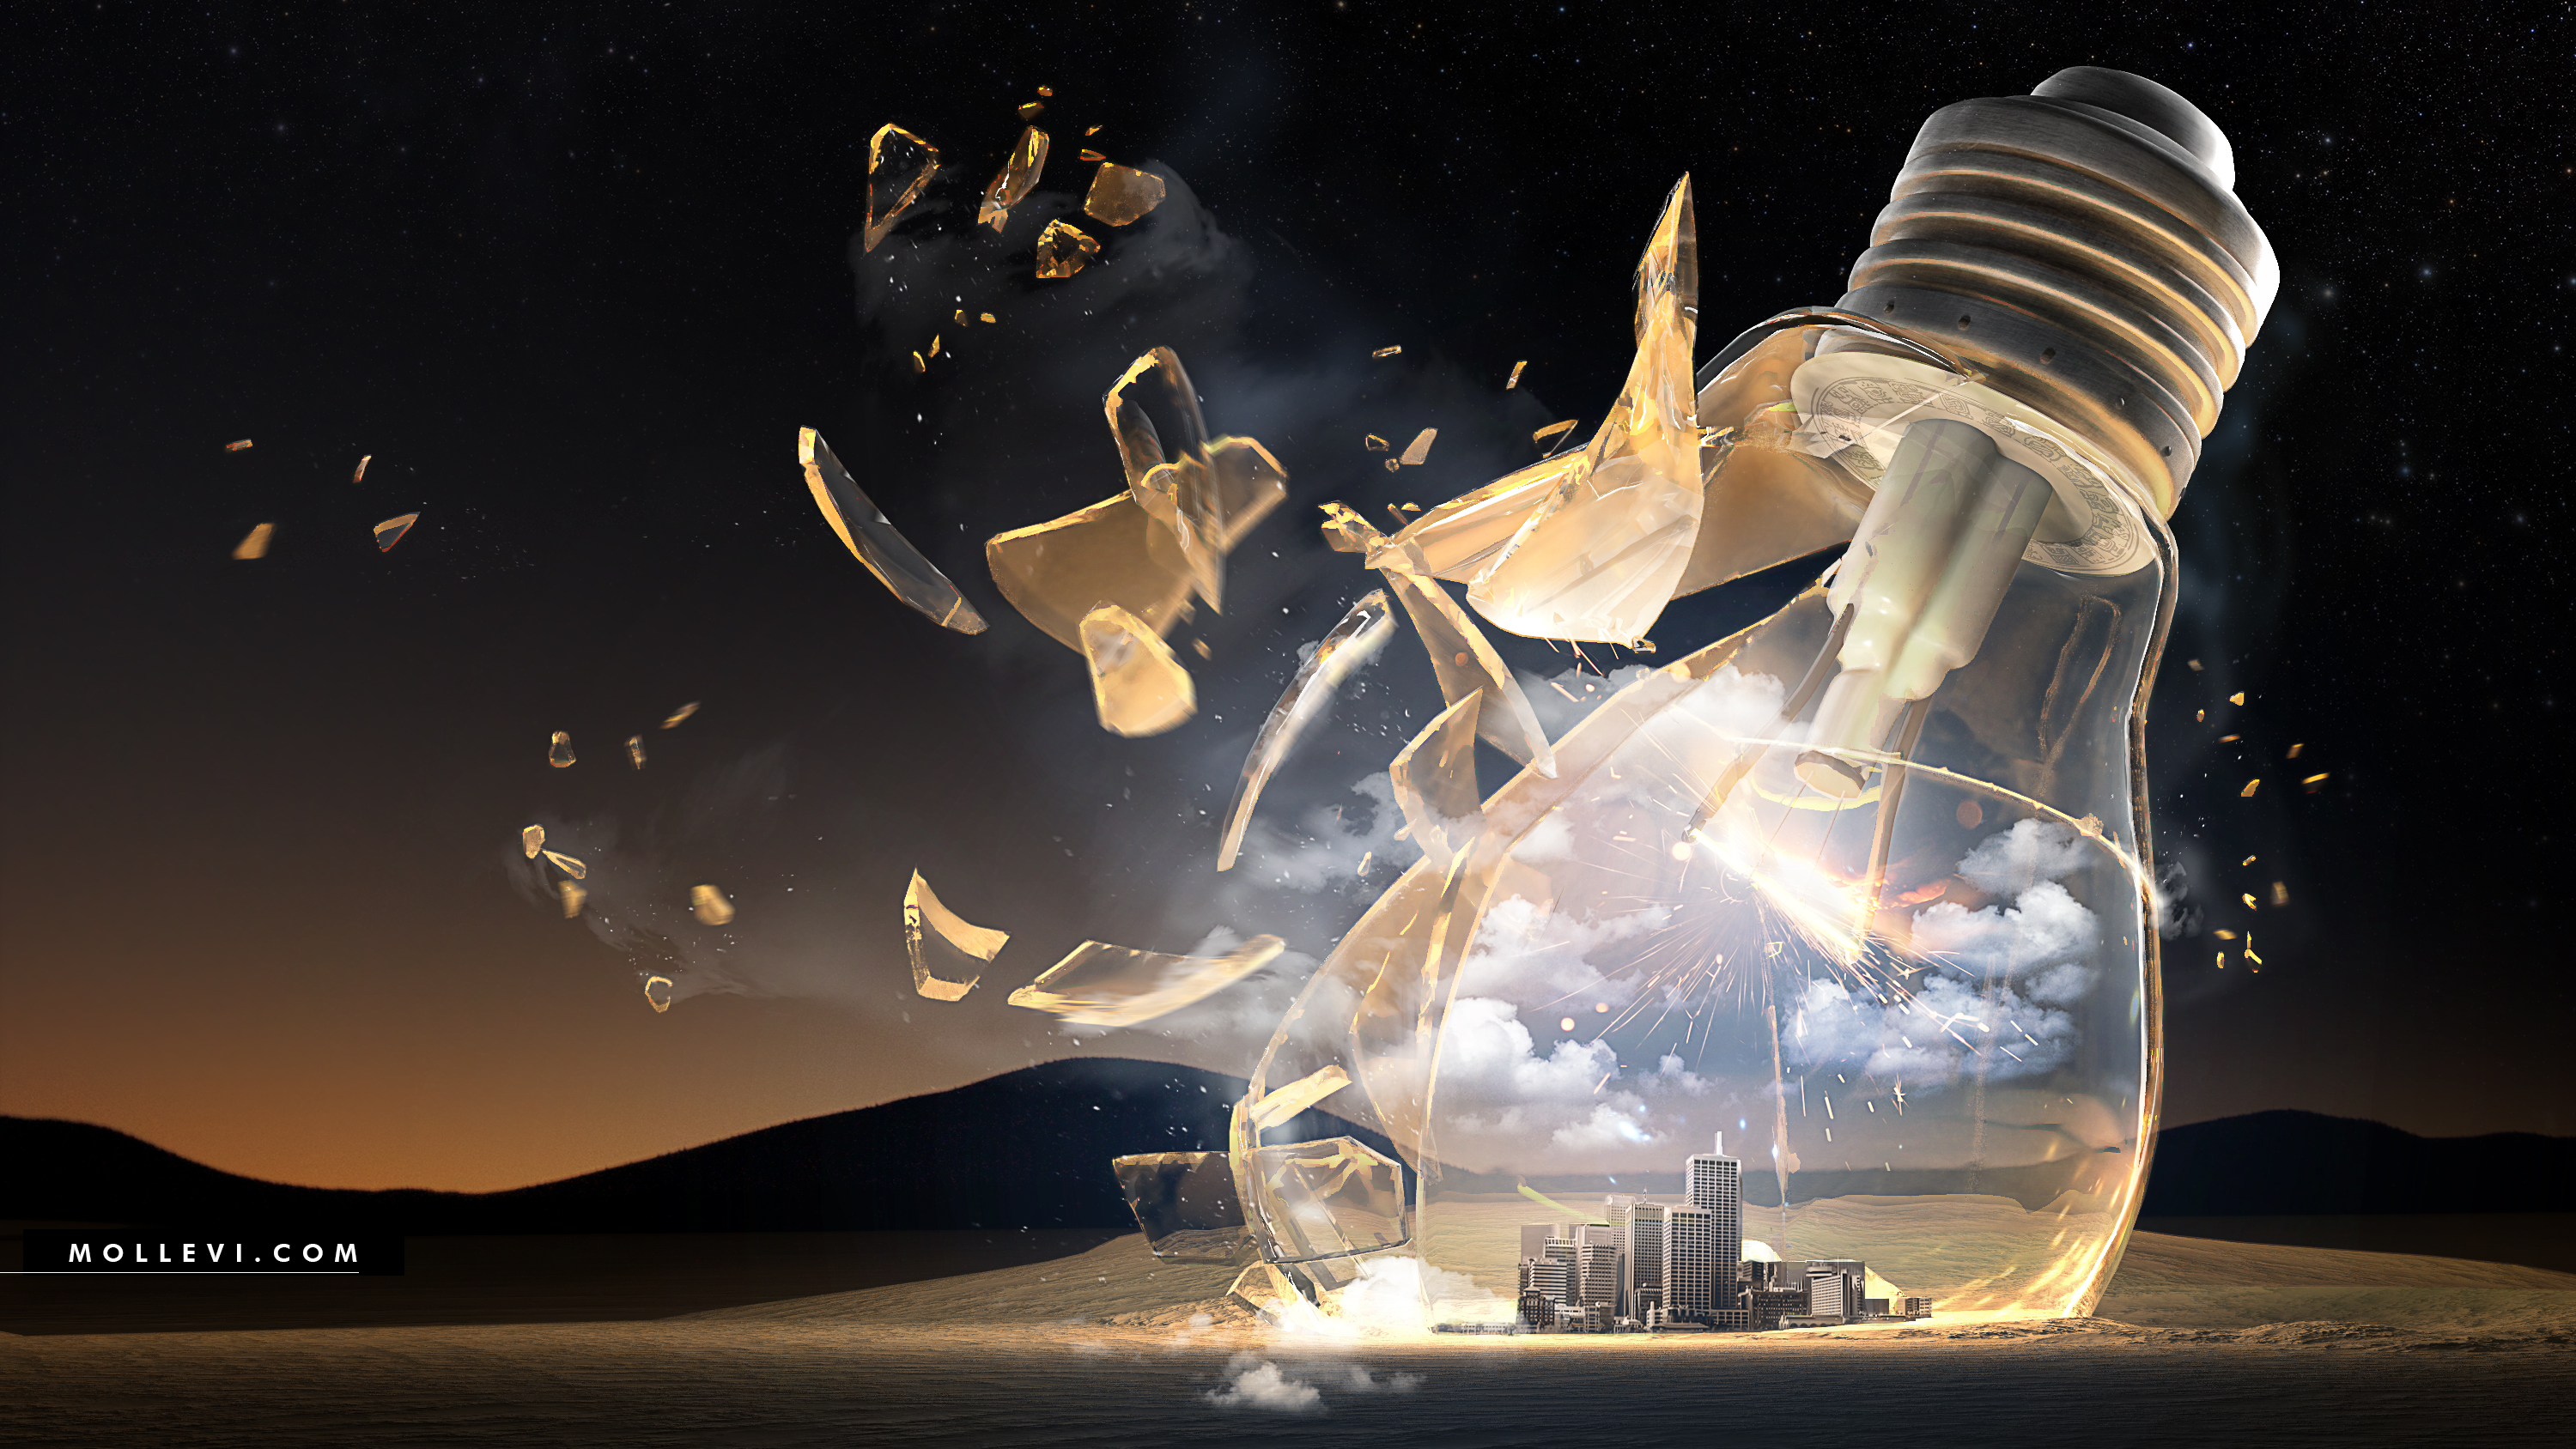
For the final touches, I have recreated more little pieces of broken glass and dust from photographic sources, some cloud brushes merged with blurring effects to recreate depth and movement, as well as some sparkle reflections inside the glass with photographic references too. In the end I always do the technique called “Burn and Dodge”: mainly I create a 50% grey layer in the overlay mode, and by doing that only the parts affected with the Dodge and Burn tools from Photoshop will affect the desired areas that I want to stand out.
Also, for the last final touch I created a merged layer on the top (Ctrl+Alt+E) as well as in the overlay fusion mode. Then I applied the High Pass effect. If you do so in this order you will be able to preview the sharp edges more easily.
8. Evolution from the model to the final artwork
Interactive Model
Get the model here.
Thanks, Molleví! Speaking of Photoshop… here’s a Maxwell & Photoshop V3.2 teaser!
With PSD output support coming in V3.2, Maxwell will be able to save the render in PSD format in 8, 16 and 32 bits. It will support multilayered PSDs so channels and light buffers (when Multilight is enabled) can be embedded as separated passes. Coming very soon!