Istanbul-based 3D Artist Mohamad Saied uses 3D modeling and rendering to produce high quality product visualizations with photography principles in mind. The 28-year-old artist has 4 years of experience and his main focus is on packaging and product design, as well as 3D modeling and advertising. You can check out his fast-growing Behance portfolio here.
In this post we ask him a few questions about one of his latest projects for which he used Maxwell.
The Project
The idea for this project was something a friend of mine and I had been discussing for a long time. We wanted to redesign the visual ID for the classic J&B whiskey bottle and combine it with our love for jazz music.
The Objective
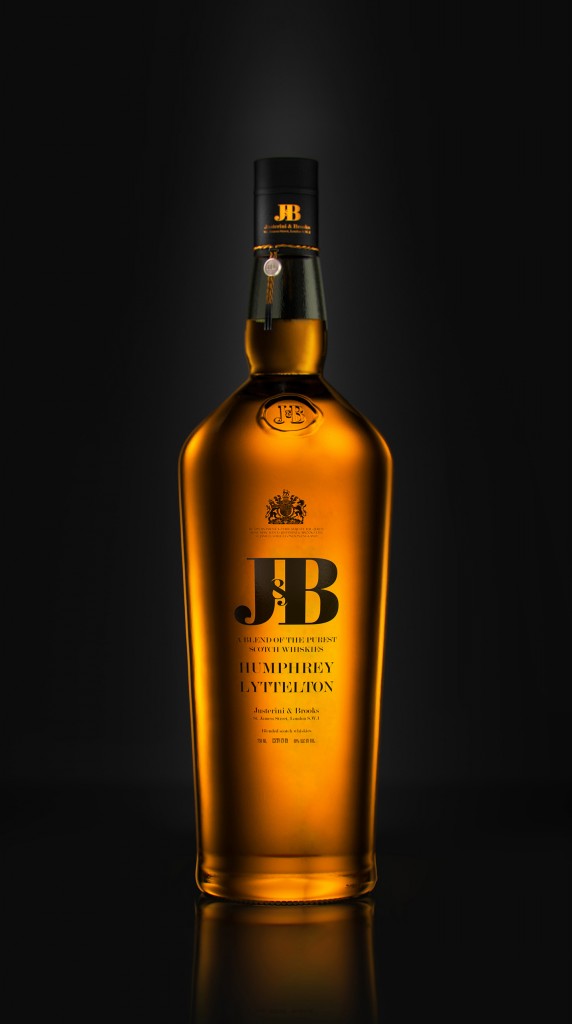
The objective was to create a modern, classy and minimalist version of the J&B bottle while retaining the key elements of the classic bottle design. Another objective I had mind from the very beginning was to achieve a realistic, product photography look when rendering the bottle in 3D.
Concept Idea
I always thought he should do a label design for J&B, something innovative and typography-driven.
I wanted to combine the heritage of British whisky and jazz music and create an atmospheric mood of classic drink and music, yet with a modern approach.
For the jazz part of the project I thought: who else but Humphrey Lyttelton to represent jazz? He is one of the icons of all jazz trumpet players and we wanted this project to be a tribute to his music and work.
Inspiration
My main focus is on product visualization and in addition I have a great passion for photography. Therefore, I always strives for my projects to be as real as any real-life photography session.
I try to apply photography principles and techniques as much as I can in my 3D visualizations and thus my inspiration for the final look and the mood of my projects is always photography-driven. Maxwell Render is a great tool to achieve that.
Product Design Rendering
I have been doing product renderings for a while. I recently added another one done with Maxwell Render to my Behance portfolio. It is a handheld gaming console from Nvidia and you can check it out here.
Why Maxwell?
Other than modeling the bottle in 3ds Max and designing the label in Adobe Illustrator, everything else in the J&B project was almost completely done inside Maxwell Render. That includes creating the materials inside Maxwell Studio, testing multiple Lighting scenarios and of course rendering the final image.
Thanks to the multiple Maxwell plug-ins, it was very easy to incorporate the software in my pipeline.
Overall Maxwell is a great tool for CG artists, and especially for product visualization artists like me. It is just an unbiased renderer, which allows me to achieve realistic results in less time mainly because it lets me focus on the artistic aspects of the project without having to worry about the technical aspects like I used to do when using other renderers.
Maxwell-Converted User
I am actually a relatively new Maxwell Render user. I am originally a V-Ray user but after a few tests with Maxwell, it is becoming my main rendering tool now.
Favourite Maxwell Feature
Blockable emitters are one of the most helpful Maxwell features for my work because it gives me a high level of control of the lighting. In fact it saves time, because without it I would have to do multiple renders and then combine them together in postproduction.
Maxwell Trick or Tip
Be experimental! Maxwell allows you to deal with the project as you would in real life. The camera in Maxwell which has every feature any real DSLR has, gives you the ability to control every detail to achieve the desired render look. And Maxwell FIRE will allow you to see the change in results immediately which is an amazing tool to have.
Maxwell Improvements
I believe assigning materials based on material IDs would be a very helpful feature to have in Maxwell. Then he could assign different materials to different parts of the same object based on Material IDs predefined to the polygons.
Making-of by Mohamad Saied
The process of getting this project done was actually pretty straightforward and simple, the redesign of the bottle label was done first. We knew we wanted a clean and minimalist design for the label but I preferred to wait before getting into the 3D section of the project.
After the label redesign was finished, I did that large area of the bottle surface which is contrary to the original bottle will be non-colored glass might dominate the image and make the render look dull. In order to maintain the simplicity of the design, I knew that the approach I would take in lighting and rendering the bottle would be very important to help the new label design and the whole bottle stand out.
So my approach to rendering the image was to achieve a high contrast look and yet an interesting color and feel to the bottle as a whole, so the new label can emerge and to get a balanced result between the label and the rest of the bottle.
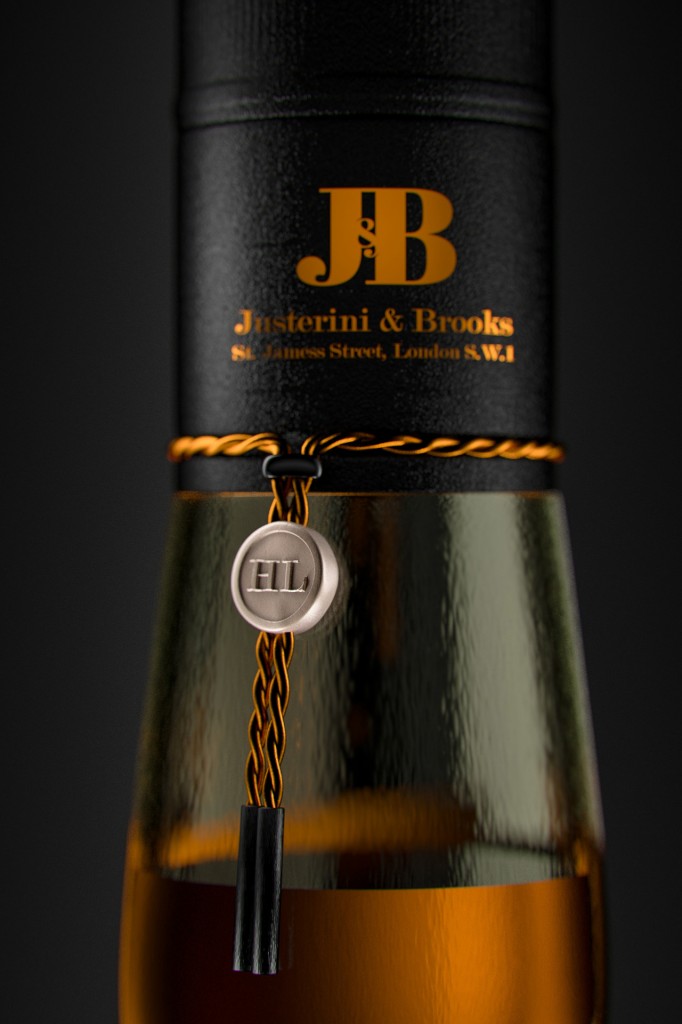
In addition to the rendering, I redesigned the neck and lid part of the bottle and added the new redesigned logo to it with an accessory on the neck which plays the role of a seal to the bottle too.

Modeling
The modeling process was relatively easy. The general look of the bottle remained very similar to the original one with only a few tweaks. I used 3ds Max poly modeling combined with a turbosmooth modifier. As for the protruding logo on the bottle and other details on the base of the bottle, I used displacement maps to create them.
Materials/Textures
I tend to create my own materials and in this case they were all created inside Maxwell Studio. I used maps which i exported from Adobe Illustrator to use them as masks for opacity and for bump effect to create the look of the label printed on the glass bottle.
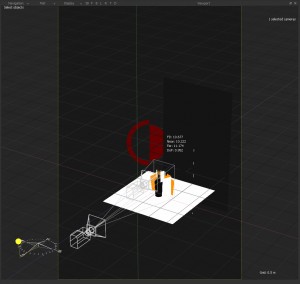
Lighting
This is the fun part! My approach to lighting inside Maxwell render is to use an HDR images which I created as emitters to light my models. The HDRIs are a collection of multiple types of gradients (circular, linear, different colors, etc.). With these HDRIs I can simulate the use of softboxes and other lighting techniques used in product photography.
I also used multiple types of reflectors. Actually the reflectors were a crucial part of the lighting and rendering the J&B bottle. Through the use of reflectors with different colors and surface properties and placing them behind and around the bottle and using the transparency and refraction of the glass to my advantage, I was able to achieve the look I wanted for both the bottle and the whiskey and I got the golden gradients in the whiskey which I was looking for.
Camera
Basic settings used in product photography were applied. In the close-up shot i played a bit with the f-stop until i got the DOF effect I wanted, which added a lot to the render.
Post Production
In the final stage, very slight color correction and noise reduction were applied to the renders in Photoshop.
And that’s it!