This week’s blog post looks at how you can speed up your workflow using Maxwell´s V3 Material Assistants. Video available here. 
Brought to you by our very own Atila Akin (aka Tom). Enjoy 🙂
In the CG industry nowadays, many users are familiar with the concept of creating a BSDF material, and have been for quite some time. But no matter how easy it is to grasp the BSDF system, it can still pose a bit of a headache to newcomers. So for V3 we decided to welcome our users with a set of common-purpose material creation assistants, aimed at saving time by speeding up the creation of everyday materials.
You can read more about BSDF in Wikipedia here and in our Support Center here.
In this article, I am going to show you why and how you should use these Material Assistants which are pretty useful, intuitive and quick…rather than creating materials from scratch over and over again.
What is a Material Assistant?
The Material Assistants shown in Figure 1 below are simply wizards – which dynamically and intelligently generate materials. They are not separately coded shaders, they are just user interface front-ends which offer you a fast and intuitive set of parameters, which in turn generate the native material composition under the hood. Contrary to a possible misconception, they are no less realistic and do not generate poorer results than the original advanced editor.
Why use Material Assistants?
I can hear some of you saying “Why bother?”. You already know how to use the advanced Material Editor (MXED) and are very efficient with it. Nevertheless, you should still consider the Material Assistants and the comfort they offer. You could make good use of them if you do any of the following:
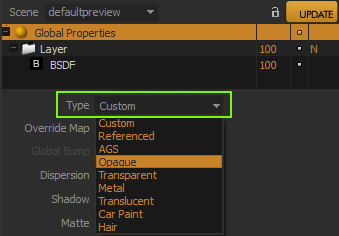
Figure 1: Types of Material Assistants released with V3
- You use certain parts of the generalized BSDF layout but not all of them.
- You repeat the same steps for creating similar materials.
- You change multiple parameters over and over.
- You sometimes search for a previously created material as a starting point.
- You sometimes create unnecessarily complicated materials, or you are a beginner and not quite sure what you are doing.
All of these listed situations can slow you down, both in terms of workflow and rendertime. In these cases it’s hugely beneficial to at least start your material with a Material Assistant. Then, whenever you need advanced controls, you hit the “Convert to Advanced” button and gain full control of the material tree. The only drawback here is that this conversion is not reversible, which means you cannot go back from the advanced editor to a Material Assistant. Worth bearing this in mind if you are going to use this workflow.
Do the Material Assistants offer all possible options?
No, they simply cover a range of commonly used material types. But do we really need infinite material options in our everyday work? Well, in our experience no! So, we decided to categorize the assistants to cover the most common scenarios. It was quite a difficult task to pick names for each assistant, because we wanted to avoid confusion between optical/technical classification and user-friendly classification. I think the current list ended up making both worlds happy. Here they are:
- AGS
- Opaque
- Transparent
- Metal
- Translucent
- Car Paint
- Hair
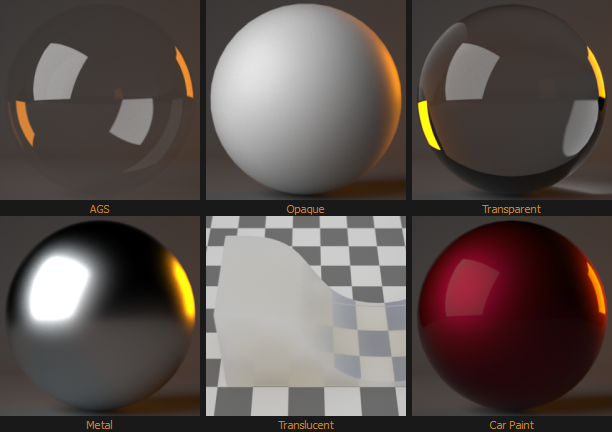
Figure 2: Some of the Material Assistants as thumbnails.
AGS
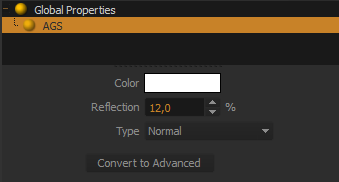 AGS is an acronym that stands for Architectural Glass Solution (cooked up by me and named by Thomas An – the creator of the world-famous Simball, during the development of the early versions of Maxwell Render). It’s a practical workaround which gives huge speed improvements when rendering window glass panels, and is mainly used by architects in their outdoor visualization work. The speed-up comes by eliminating refraction and keeping the reflections by replacing real dielectric glass with a low opacity mirror.
The assistant parameters for AGS are pretty straightforward to use. You have Color and Reflection %. In addition there is a Type dropdown which has two more options: Normal and Clear. Still wondering what’s going on behind the scenes? Click “Convert to Advanced” and feel free to erase or improve the suggested options!
Opaque
This is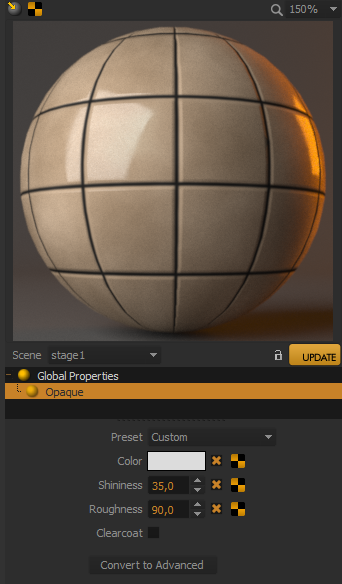 a general plastic shader and is possibly the material creation assistant you will most frequently need. The idea is the following: you start by creating a material giving it a base color, and then you set the shininess of the surface (if any). It also gives you the option to add textures to these parameters, so that you can create more realistic and complex surfaces – all in just a few clicks.
If you look around, there are lots of materials in the real world which match this concept. You can easily create chalk, walls, wood, brick, stone, floor, plastic, fabric, paint, and so on, all by using this one wizard.
There’s also a Preset dropdown for picking one of the ready-made settings. You can even build your own presets by editing the XPR files found under the installation path: …\extensions\presets\
Clearcoat is an optional and physically-accurate method of quickly adding a perfectly specular topcoat when you have a semi-glossy shininess/roughness combination.
In the example above, you see a tile material made using this assistant by loading the texture option with procedural textures. You could easily add more complexity and realism by blending more procedurals. All this with such a simple assistant!
Furthermore, you could convert it to Advanced and keep adding more stuff when needed. Or you could directly convert to Advanced, even without initially modifying the assistant itself, turning it to a template bridge of your own. As you can see, there are many benefits to these innocent looking assistants.
Transparent
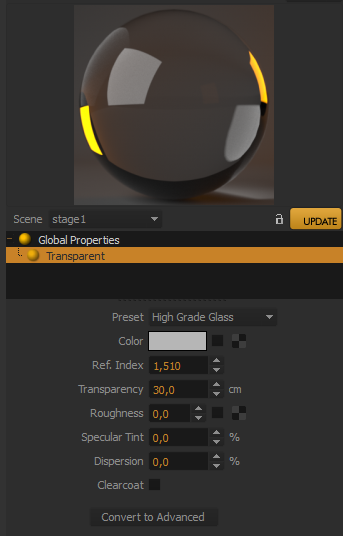
The transparent assistant is for creating the most common transparents we use every day such as glass, water, color glass, frosted glass, ice, diamond, ruby etc. It also comes with a nice set of presets.
As you probably know, specular color usually has no tinting. This means that a reflection of a white emitter will be white on a red glass. If the surface is made rough, the glossy reflection will remain within grey/white shades. So, by default the parameter Specular Tint is zero. Increasing this value would blend the base color with the reflections, making the surface look more metallic.
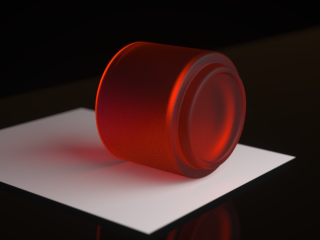
Figure 3: A test render showing frosted red glassware.
You might find this helpful for making very rough surfaces, and avoiding the chalky white look which ruins the base color.
Dispersion will override the checkbox under Global Properties and will only work when the value is greater than 0. This feature will slow down the material render performance remarkably, although it gives an amazing look, especially to clear glass and acrylic parts.
Metal
The Metal Assistant is designed to create common metals in several roughness levels, with fully customizable anisotropy where needed. Furthermore, it helps you to easily add a dusty look with a single value spinner or even partial rust and dirt, using a texture. Bear in mind that the transparency / alpha of your texture will be automatically used as an opacity mask for Dust & Dirt.
We all know that metals are usually boring when you don’t add enough complexity and especially when you are going with a single BSDF approach. The Metal Assistant creates metals using 2 BSDF and diff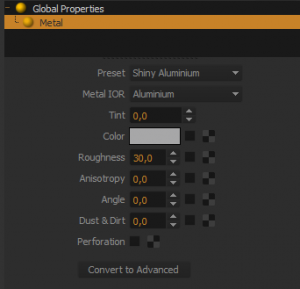 erent roughness for simulating the fine and medium micro-scratches apart. Of course this multilevel specularity adds to the realism.
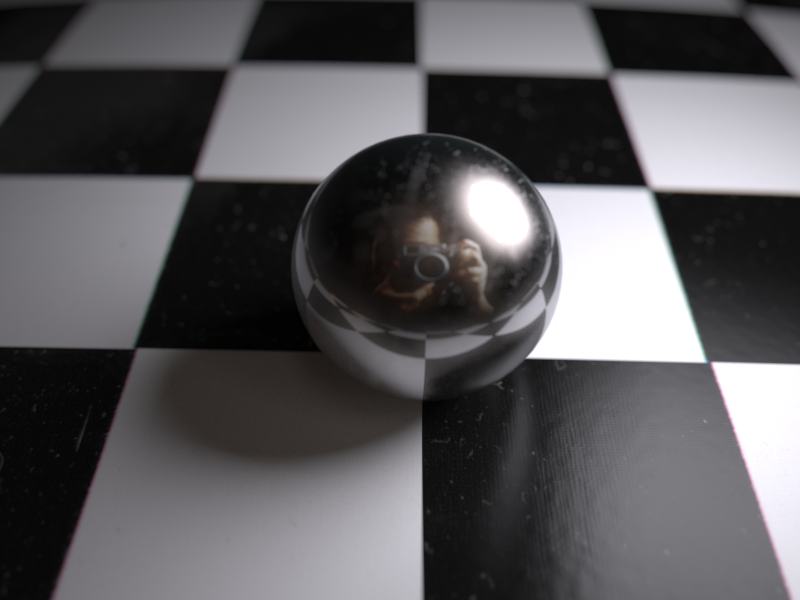
- Figure 4: Creating highly realistic metals with the assistant is easy.
All metal parameters support textures, so you can create countless different metals with different combinations and textures. In addition to all of the above, there is a Perforation field which is very helpful for creating perforated sheet metal. You can load a tilable mask for perforation (the whites will be perforated) and create sheet metal with holes or metal fences etc. Changing Metal IOR will give you the chance to switch between measured Fresnels of different metal elements, which is quite important in the jewelry industry.
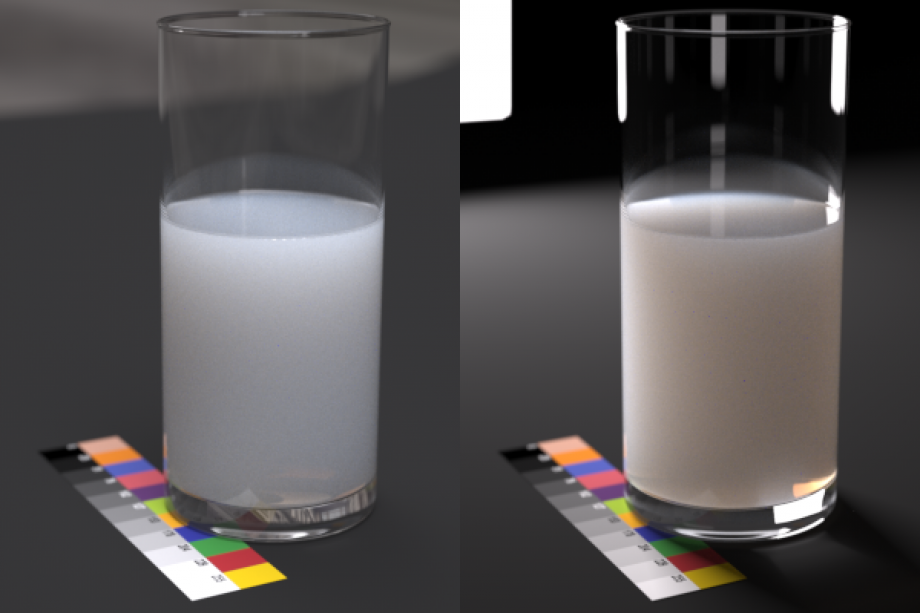
Figure 5: An example of a drink which is not easy to simulate accurately using SSS models with other render engines.
Translucent
The Translucent Assistant is probably the most anticipated one, because setting up Sub Surface Scattering in Maxwell is complicated for just about everyone! This is because simulating physically accurate SSS materials is computationally very expensive.
While speed is one of the issues, offering a set of user-friendly variables is another one and is probably more important than speed. This is why we worked hard on a range restricted translator, which is flexible enough to create most of the common industrial materials.
At first sight, the interface of this assistant might look scary due to the amount of parameters, but let’s take a look, and I’ll show you that it’s actually pretty easy.
First of all, let’s forget Hue Shift and Invert Hue for the moment, as they are rare extra controls for complicated materials, so we don’t need them.
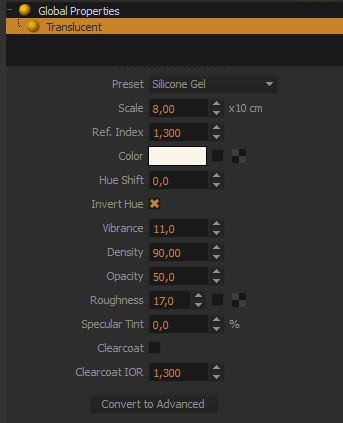
I suggest you start playing with Color first and see how it reacts to change, whilst maintaining translucency at the same level. As you know, doing the same in the advanced material editor mode is extremely difficult, so this is a big plus. You don’t have to pull your hair out searching for the right values of transmittance color, attenuation value, scattering color and scattering coefficient – so it’s much easier!
Now, playing with Scale, you can scale the effect of translucency without affecting the color, which is again something more intuitive than was previously possible. As you see, Color and Scale alone are extremely helpful for creating safe SSS materials, and by “safe” I mean noise free.
Density will do the same thing as Scale, whilst maintaining the Scale intact. So, Density and Scale are two different ways of making the same change to the look. We have these internally linked in order to offer a more intuitive control, independent or dependent of object size.
Normally, the internal scattering color is taken as white, so the object takes its color from the given transmittance color and fades out as it scatters. Increasing Vibrancy blends the given color into the scattering color, and helps you preserve the given color in the output, as seen below.
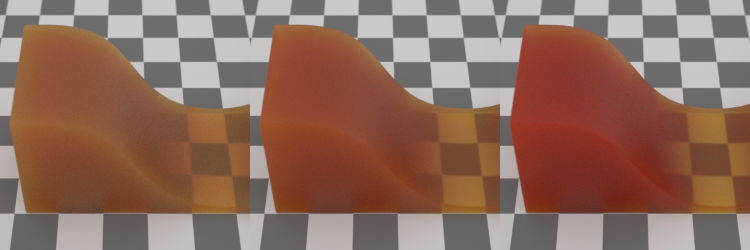
Figure 6: The effect of increasing Vibrancy. (left to right)
Opacity is the asymmetry of scattering direction. You should leave it at 50 for an isotropic scattering by default. You can change it anytime for breaking the balance between forward and backward scattering.
Hue Shift is an optional angular color mutator for computing the scattering color, using the given transmittance color instead of using the same color. In other words, the assistant doesn’t ask you for a scattering color but, you can still force it to use another Hue of the same color. It is designed this way help the user not to go out of range by setting improperly bright or dark shades, using a custom color chip. It is also limited between -120 and +120 degrees. I suggest using small angular changes for more realistic results. Invert Hue sets an inverted scattering color, while Hue Shift keeps shifting it starting from that origin.
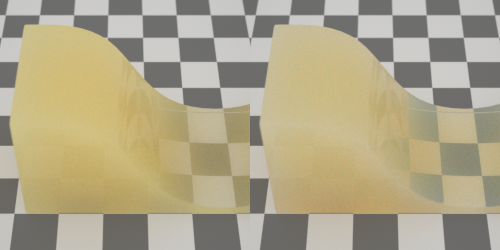
Figure 7: Hue Shift 0 Vs Invert Hue Shift -20
Car Paint
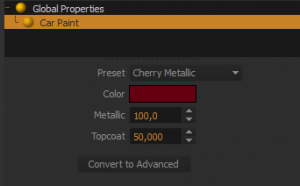 Simulation of Car Paint, especially the metallic ones with flakes and iridescent tones is a serious business and so this simple assistant only gives you a car paint with controllable base paint metallicity and a controllable topcoat shininess. More complicated car paints can still be made with more sophisticated setups found in the advanced editor. I guess this assistant is pretty straightforward and simple to use without further explanation.
Hair
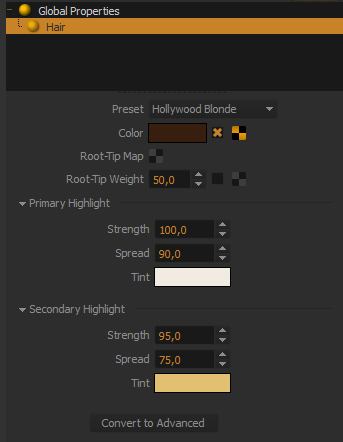 This is probably not a frequently used material, but surely an essential one for character artists and animators. This highly dedicated shader internally uses bump and normal maps in order to recreate and control the hair fibers. You can convert it to Advanced and check how it uses these internal textures. All the rest is a matter of providing a desired hair Color and properties of multiple highlights as Strength / Spread / Tint.

Figure 8: An example of blonde hair created using Hair Assistant.
A sincere confession and suggestion…
In the beginning, I will admit that was totally against the idea of making these Material Assistants. But, in the end we agreed to do them – keeping them as simple as possible. Today, I confess that I use them all the time so I strongly recommend that you do the same, whatever your level of expertise. Thank you sticking around for the long read and see you in another blog post…