
Hi guys,
This week on the blog we have a different case study – one that shows how Maxwell is being used for combining photography and CGI.Talented photographer and CG artist Matthew Cherry is a skilled Maxwell user who has brought to our attention a number of gorgeous projects over the years. Now he has agreed to take us behind the scenes of one of them. Let’s enjoy the cinematic feeling and learn more about his workflow!
 A photographer and cinematographer, Matthew Cherry‘s visual storytelling ability, resonates in both his portraiture and conceptual imagery. His work has the ability to intrigue, delight, and inspire the viewer while merging art, theater, and photography. His dramatic use of lighting builds depth and a rich palate that creates a cinematic tone within his work, while detailed sets and polished styling exude glamour and sophistication.
By working with extraordinary stylists, makeup artists and prop masters, Matthew and his team continue to create amazing visionary scenes both realistic and fictional. Matthew draws his inspiration from a wide range of sources, most notably Italian and French cinema, American Film Noir and American Jazz artists of the 40s and 50s. In addition to his creative work behind the lens, Matthew has been involved in business marketing for the past fifteen years and has designed and run numerous local, national and international marketing campaigns. You can check out Matthew’s web, and follow him on Facebook, Twitter or Vimeo.
The Challenge
Midas was conceived of as a personal/promotional project designed to showcase our studio’s ability to create photorealistic environments that can serve as background plates for talent that is shot in-studio. As advertising and editorial budgets continue to shrink, it is often too costly to produce the kind of iconic shots many envision. This is especially true of smaller agencies looking to “make their mark” by producing innovative work with high production values. While many agencies do use CGI in their workflow, they tend to think of it more as a special effect.
By integrating CGI in a cinematic manner, we believe that more compelling artwork can be created in which costs are dramatically reduced and production values remain high.
The Process
As a freelance studio working on a promotional project, all of the input was ours. I concepted the shot and did the art direction and casting.
The objective of this shot was to create a polished example of a celebrity portrait of the type used in film and television advertising.
This type of shot meant that casting and wardrobe were both critical to achieving the final look. To that end, my wardrobe stylist, Tanya Seeman, created the look for the talent, which included creating a handmade, couture outfit for the woman and custom accents for the man.
Given current trends in high-end television programming, we wanted to produce a modern photograph that paid homage to the music scene of the 70s. The concept was a producer who had “the touch” for producing gold records. Touch of Gold records became the back story and “Midas” was born.
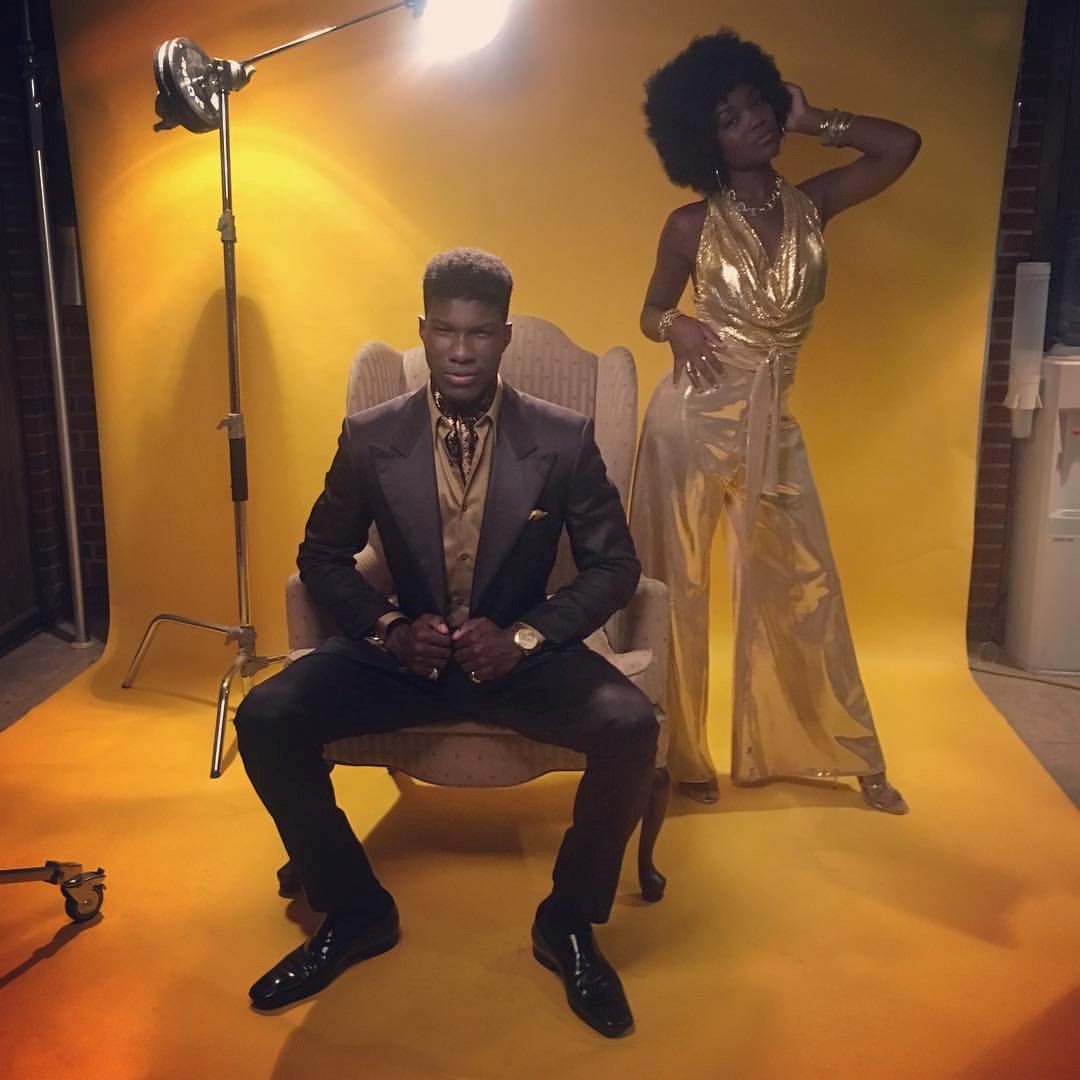
Creating an entire “gold” room and making it appear to be real was a much harder challenge than first anticipated.With Maxwell it is easy to create a convincing gold material.However, if all the objects had been made of actual gold, even with the use of dirt and dust maps, it would be obviously fake.
The challenge was to create objects that could plausibly exist within the real world, with authentic materials that still gave the impression of a gold room.
This meant creating not only a variety of gold metal materials but marble, leather, lacquer paint, plastic and even paper. To overcome this challenge we first produced the shot as if we had to source all the props in the real world and build a physical set. This provided real-world analogs to what we wanted in the scene, and we were able to see what was really possible. These references were invaluable in creating believable materials. Additionally, we made sure that any variable that was used, was mapped. Because Maxwell does not allow for the use of procedural nodes, this meant first creating the maps in either Substance or Photoshop. In addition to mapping all variables, most materials have some level of dust, scratches and fingerprints applied to them as well. While not always readily apparent, I think it still registers with the viewer and contributes to the authenticity of the material
The role of Maxwell
My training is as a photographer and cinematographer, so for me, Maxwell is a natural rendering solution as it allows me to use the skill set I already have to produce beautiful renders. Also, as a photographer, I take light very seriously. If the light in a scene does not behave properly and does not interact with the materials in just the right way, the effect is ruined for me. My goal is to create the most photorealistic images possible, and to my eye, Maxwell does very well in this regard.
Everything in the frame, other than the two actors, is a render. Even the chair the male actor is sitting in is a render.
I created all the materials that are found in the scene. Sometimes I would create them from scratch and other times I would use the Material Gallery or the Material Assistants as a starting point. My workflow is to begin a model or project in Maya, whether I use a purchased model as a starting point or model an item from scratch. Since I often use purchased models my first task is to clean up the geometry and re-uv the model since the existing geometry and UVs are often problematic. After I clean up the model in Maya, I then bring it into Z-Brush to sculpt in a bit more realism. Once I have a finished, working model, I then decide if I can use a repeating texture or if I need to paint a texture in Z-Brush, Mari or Substance Painter. To create base textures, I also use Substance designer. Once I’ve put together all the maps, then I create the MXM material using the Maya Plugin. The rule is any variable worth having is worth mapping, so ever slot gets a map. Once the texture is created, then I add additional layers for dust, scratches, fingerprints, etc. Then I test render the prop in a virtual studio with HDRI lighting to see how it reacts.

I use Multilight all the time and it has become a pretty indispensable part of my workflow. The ability to adjust lighting post render is fantastic.
While I have tried out the new Multilight | Standalone app, if I need to relight I do it either in Photoshop or After Effects. Extra sampling also plays an important role in my workflow.
Because I tend to render to a pretty high resolution (6K to 8K) extra sampling helps to keep render times down.
In this case, because there were so many surfaces that needed to get clean, I just let the whole scene render to sample level 20.
Postpro
I try to do as much in the render as possible and the Multilight feature makes that much easier. However, I still do a fair bit of post-production within either After Effects or, in this case, Photoshop. Most of this has to do with comping in the talent which we shoot in studio. In order to make this a seamless process, we take our custom camera setup from Maya and duplicate it exactly in the real world, including height, rotation and tilt as well as ISO, Shutter Speed and F-Stop. Additionally, we use the lighting information from Maxwell along with the light positions in Maya to create the lighting plan that we use when photographing the talent in studio. By duplicating what appears in the scene, we are able to create a seamless effect. When doing this it is important to remember to place the same lights in the scene that you will be using to light the talent. So, for this shot, there is a large (virtual) scrim positioned just in front of the chair, above the talent and angled down at a 45-degree angle. This matched the studio lighting setup for the talent. Without this step, the lighting in the scene won’t match the light on the talent and they will look comped in.
The Final Piece
I am beyond pleased with the final result.
I have since shown this image to numerous art directors who have been blown away by the amount of realism in the set.
NONE of them thought this was a render until they saw the behind the scenes video (see below) that we created to showcase the construction of the scene. Based on that, I consider this a huge success.
Project credits:
- Matthew Cherry – Art Direction & CGI, Photographer
- Dan Galli – Assistant
- Tanya Seeman – Props and Wardrobe
- Delina Medhin – Hair & Makeup
- Shermon Solo Braithwaite – Male Talent
- Melinda Berry – Female Talent
Software used:
Hardware used:
- Mac Pro
- Wacom Tablet
- X-Right Color Management System
- Mamiya RZ67 ProIID with a Leaf Credo 80 Digital Back
- Hensel Lighting